How to add a new page in WordPress and add it to the menu
Prerequisites
- WordPress
Overview
Adding a page and adding it to your menu are two separate jobs in WordPress, which is why a page you have just published often does not turn up in your navigation on its own. By the end of this you will have written a new page, set its web address, published it so the public can actually see it, and added it to your menu in the position you want, including as a drop-down underneath an existing item. Writing and publishing the page needs only an Editor account. The menu half sits under Appearance and needs an Administrator, so if your left menu has no Appearance item you will need to ask whoever looks after your website. Allow about twenty minutes the first time.
Open the Pages screen and start a new page#
Pages are the fixed parts of your website, the ones that sit in your menu and stay put, such as About or Contact. They are a different thing from posts, which are dated news items and behave differently. If what you are making would still make sense in two years, it is a page.
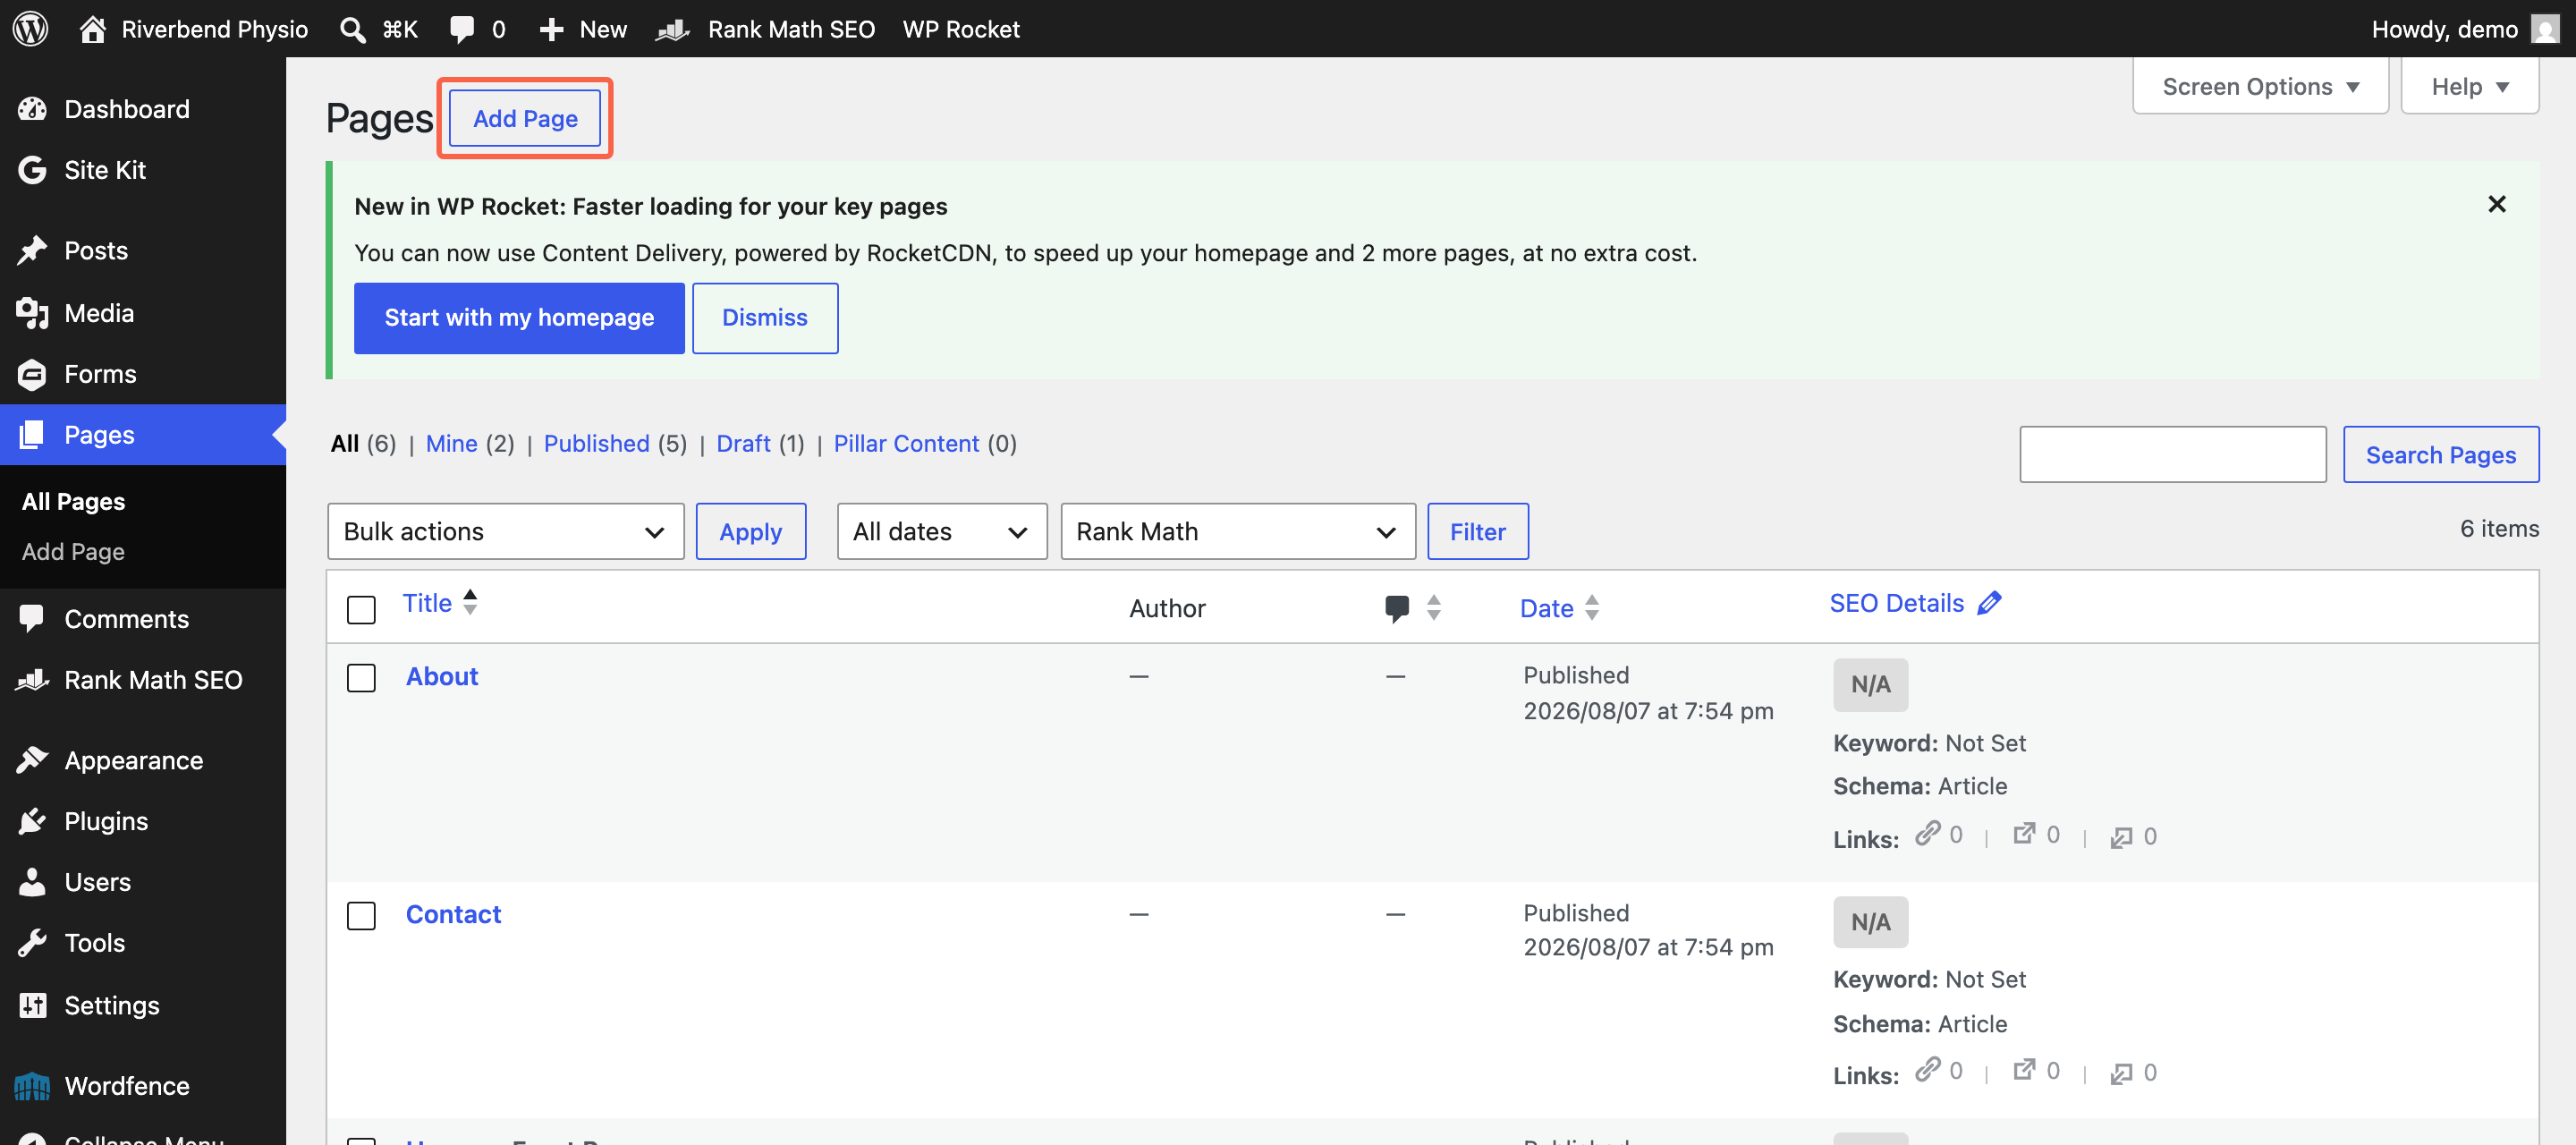
Log in to your dashboard, usually your domain followed by /wp-admin. In the dark menu down the left, click Pages. You get a list of every page your website already has, finished and unfinished. Now click the Add Page button beside the Pages heading at the top of the screen. There is a second Add Page link in the left menu underneath Pages and it does the same thing.
If you have used WordPress before and are hunting for a button called Add New, it was renamed. Add Page is the same button.
Give the page a title and write the content#
The title is what people read at the top of the page, and it is usually what ends up as the wording in your menu later, so keep it short and say what the page is. Click the large grey Add title and type it.
Press Enter and start typing underneath. Every paragraph you type becomes its own block, and you do not have to do anything to make that happen. To add a heading, an image or a button instead, click the black + button at the top left and choose it from the list.
Nothing has been saved at this point, and nobody can see any of it yet.
Set the page address before you publish it#
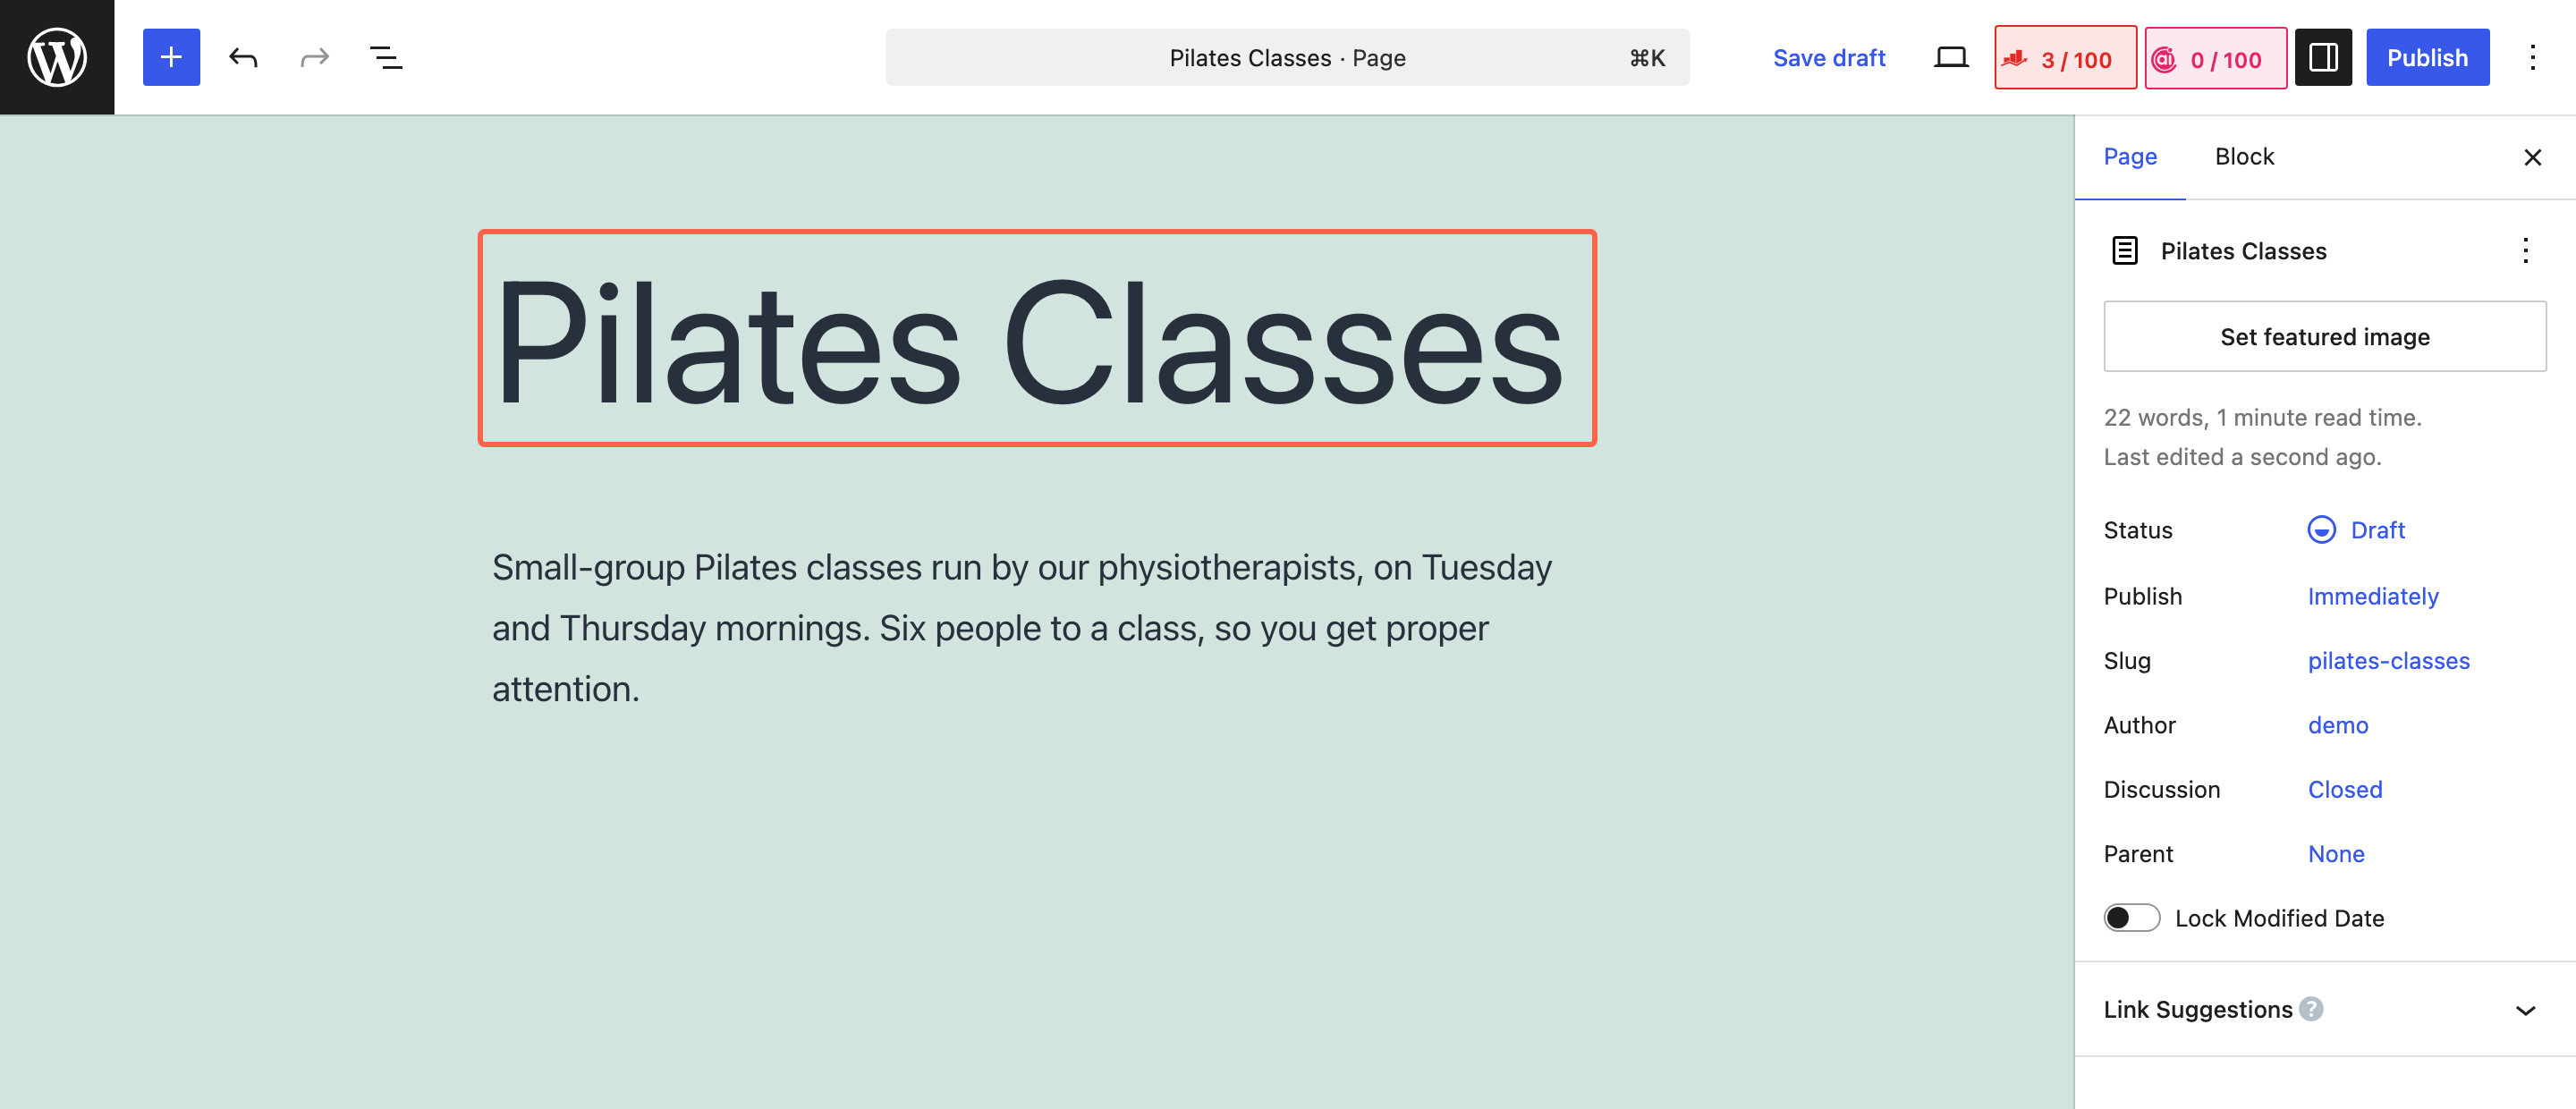
The address, sometimes called the slug, is the last part of the web address for this page. WordPress makes one out of your title the moment you first save, so a page titled Pilates Classes becomes /pilates-classes/. That is usually a sensible answer, and this is the moment to change it if it is not.
Click Save draft at the top right. In the settings panel on the right, make sure the Page tab is selected rather than Block, then click the blue address next to Slug. A small panel opens with the address in a box and the full web address printed underneath it. Edit it to whatever you want, using lower-case words separated by hyphens, and keep it short.
The row underneath is Parent, and it is worth understanding because it gets confused with the menu. Leaving it as None keeps the page at the top level. Setting it to another page changes the web address so this page sits underneath that one, for example /services/pilates-classes/. That is a change to the address only. Where the page appears in your menu is a completely separate setting, further down this guide.
Publish the page#
Until you publish, the page exists only for people who can log in to your website. Save draft keeps your work safely without putting any of it in front of the public, which is what you want while it is half written. Publish is the thing that makes it visible. When somebody says a new page is not showing up, it is still a draft far more often than it is anything else.
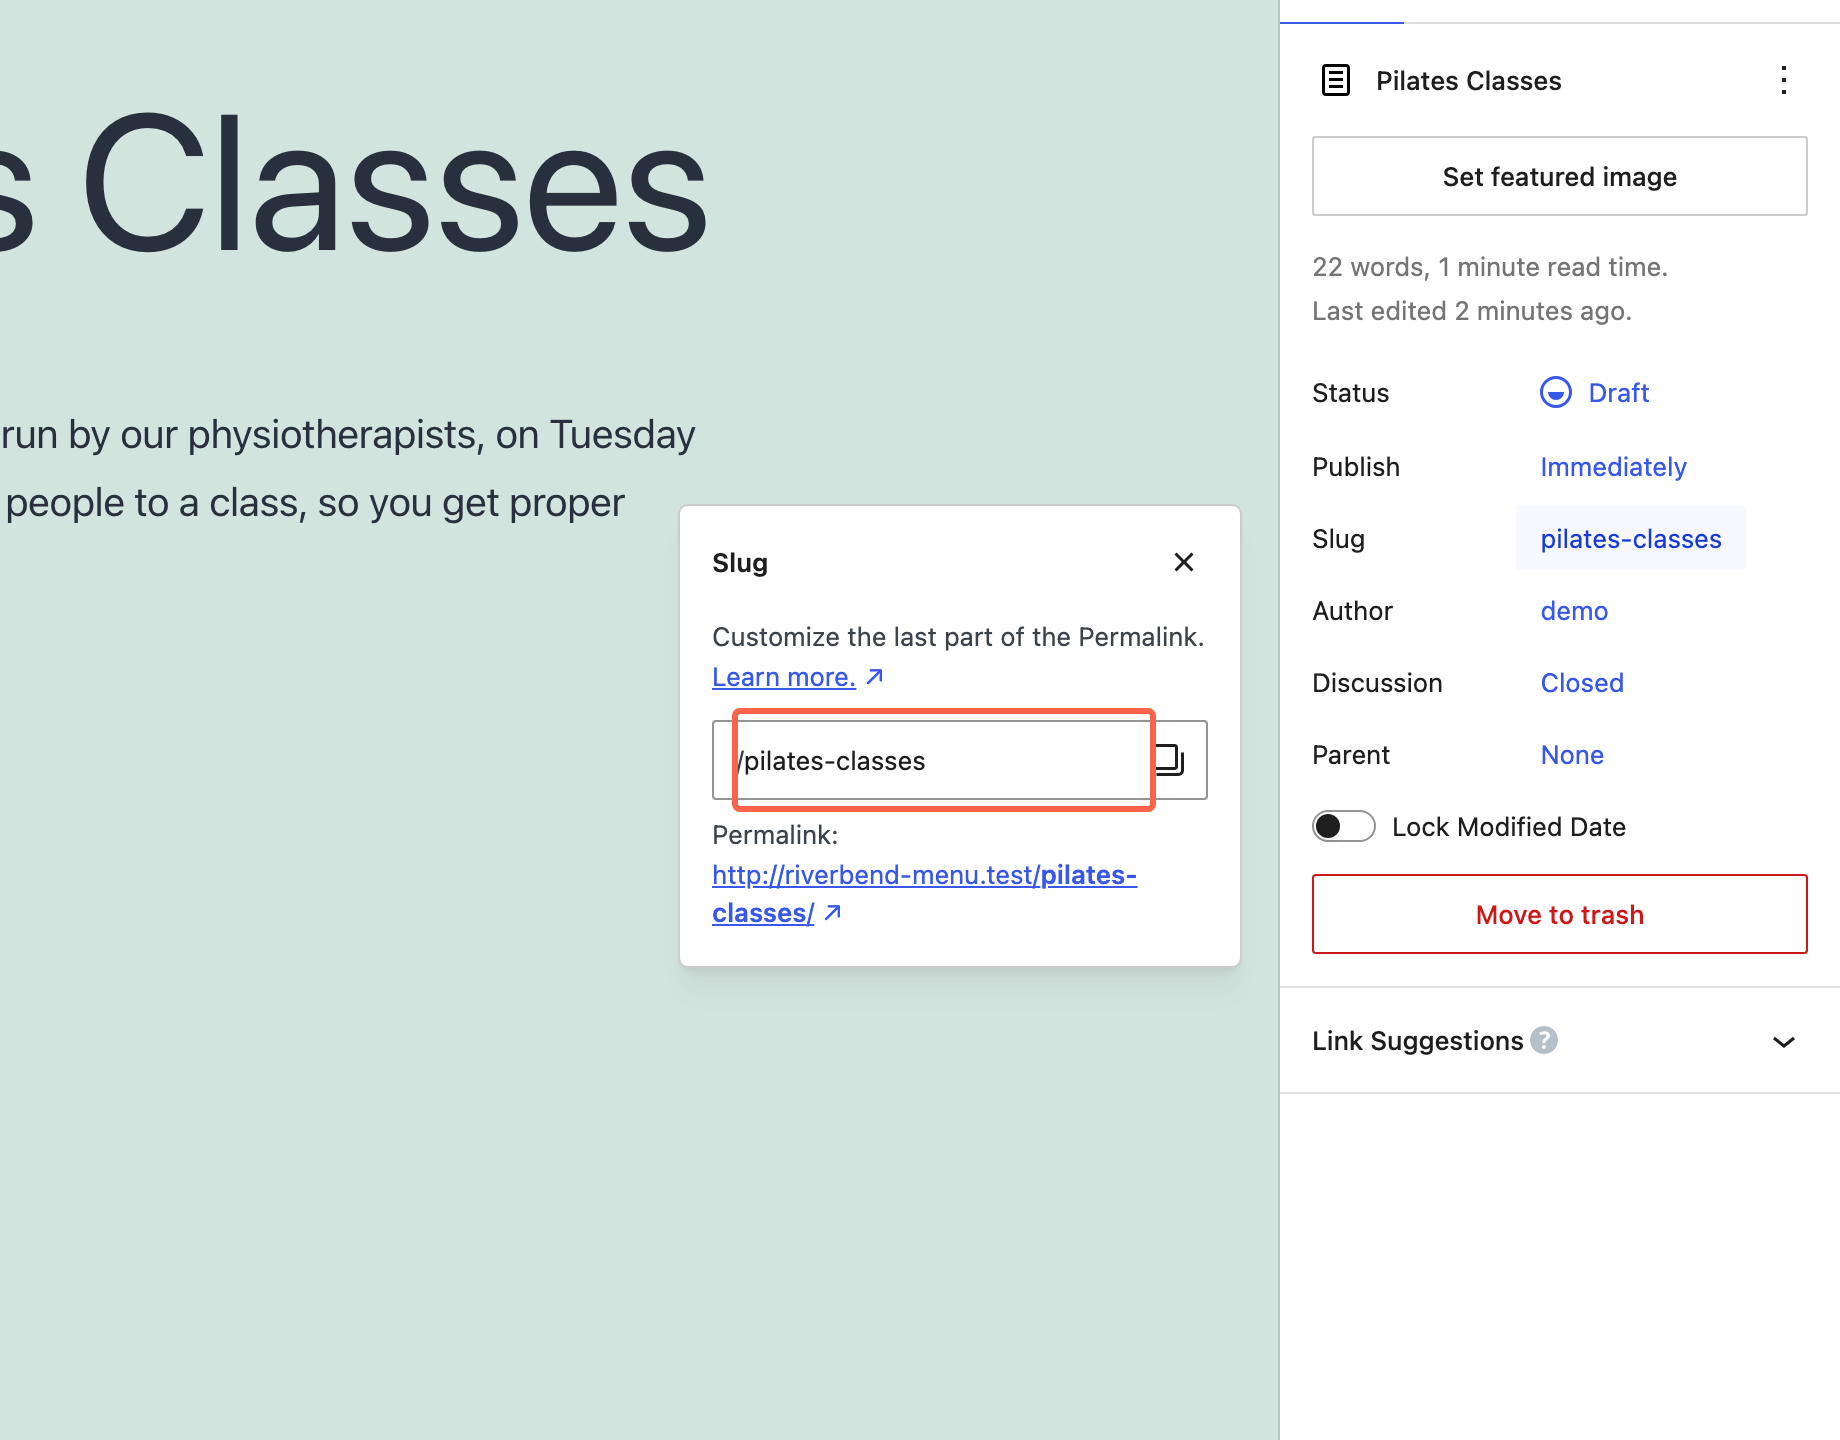
Click the blue Publish button at the top right. A panel slides in from the right asking “Are you ready to publish?” and showing your website name, Visibility: Public and Publish: Immediately. Those defaults are what you want. Click the Publish button at the top of that panel to confirm.
Your page is now live at the address you set, and you could send someone that address right now and they would see it. It is not in your menu, and it will not put itself there. That is the rest of this guide, and it is the part almost everybody is actually looking for.
Open the Menus screen#
Your menu is a list you keep by hand, held separately from your pages. That is the reason publishing a page changes nothing about your navigation, and it is deliberate: most websites have more pages than anyone would want in a menu.
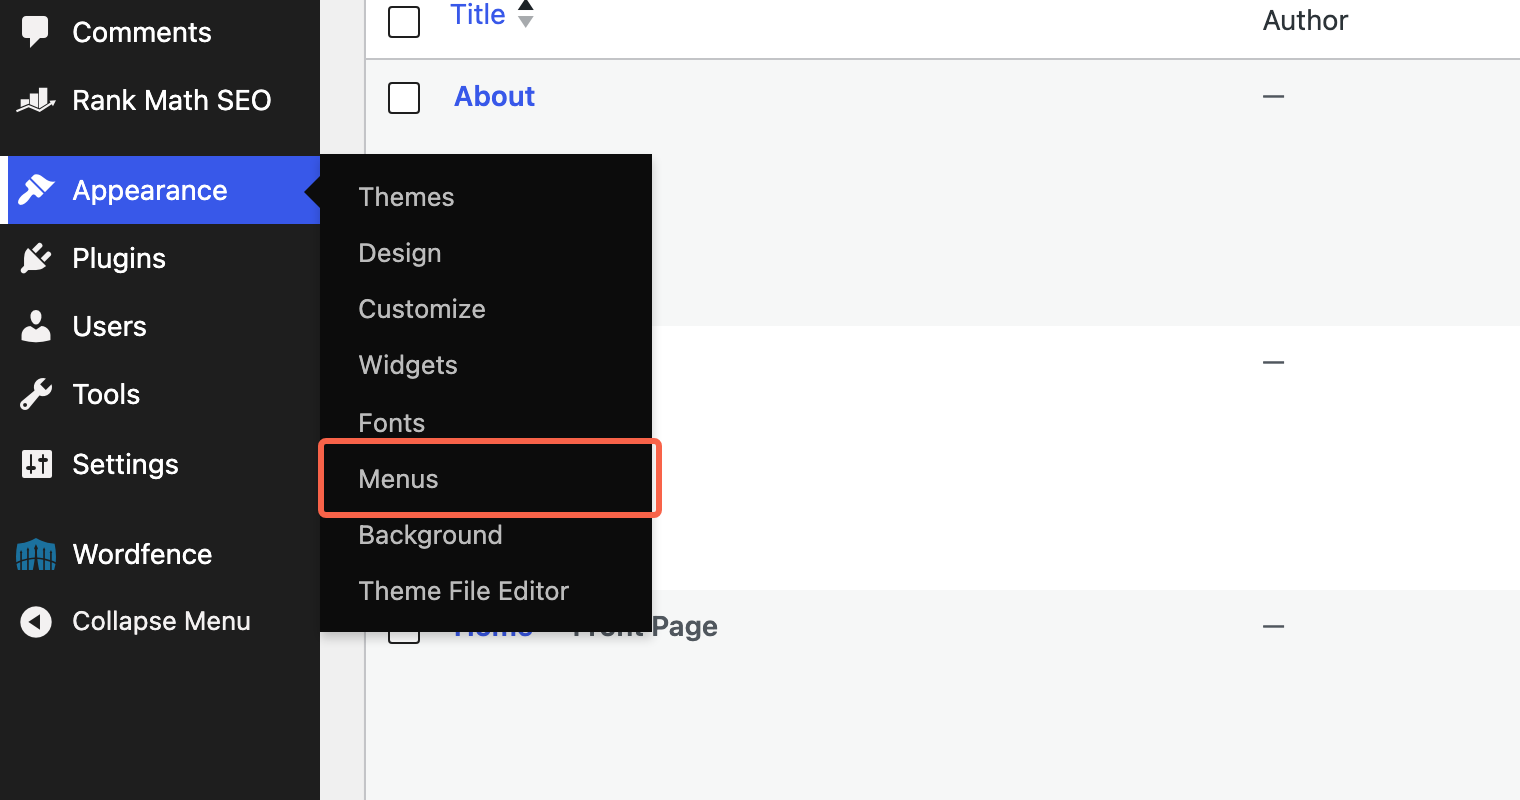
In the left menu, hover over Appearance and click Menus. The screen is split in two. On the left, Add menu items, with your pages listed under a Pages heading. On the right, Menu structure, showing what is in the menu at the moment. If your website has more than one menu, choose the right one from the dropdown at the top and click Select; the one across the top of your website is usually the one marked Primary.
If Appearance has no Menus item in it at all, your website uses a newer style of theme and its navigation is edited somewhere else entirely. Nothing has gone wrong. Skip to the last step.
Add the page to your menu#
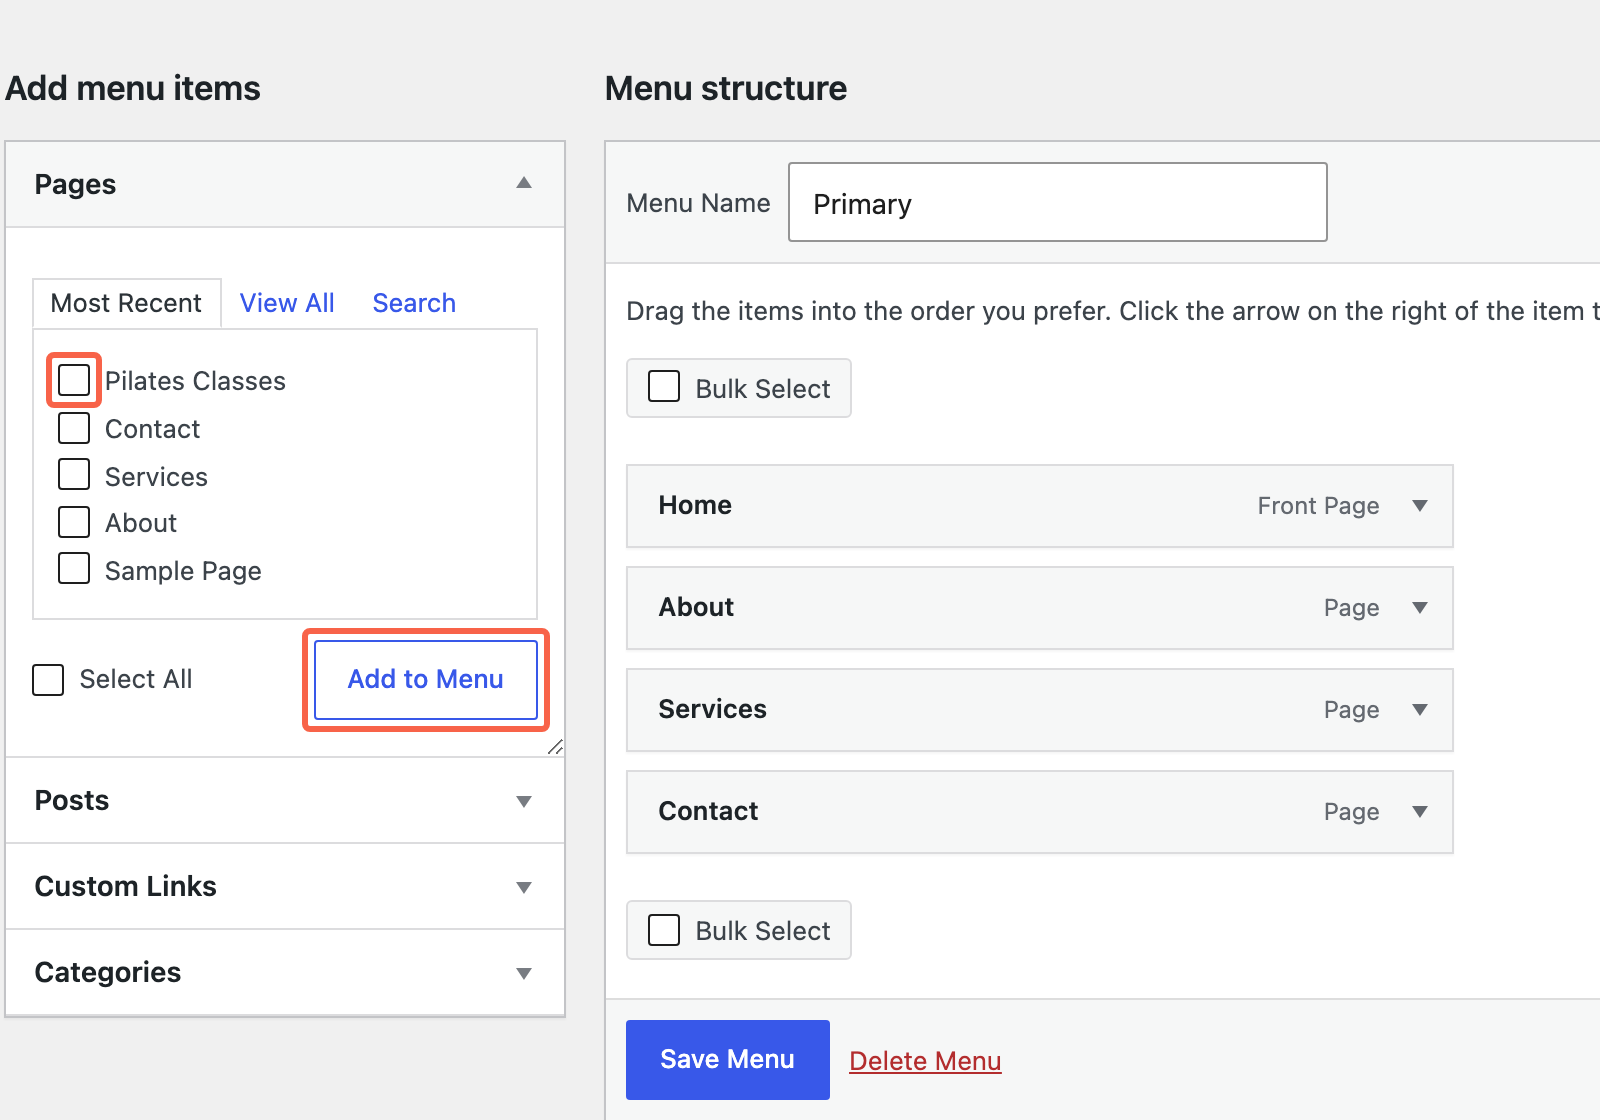
On the left, under Pages, your new page should be sitting at the top of the Most Recent list, because it is the one you just made. If it is not there, click View All to see every page, or use Search.
Tick the box beside it, then click Add to Menu. It appears at the bottom of the Menu structure list on the right. This is worth looking at for a moment, because it is the whole point of the guide in one screen: the page is published, it is sitting in the list on the left, and until you tick it and click that button it is not in the menu on the right.
Nothing has been saved yet. If you closed this screen now you would lose it.
Move the page into position, or nest it under another item#
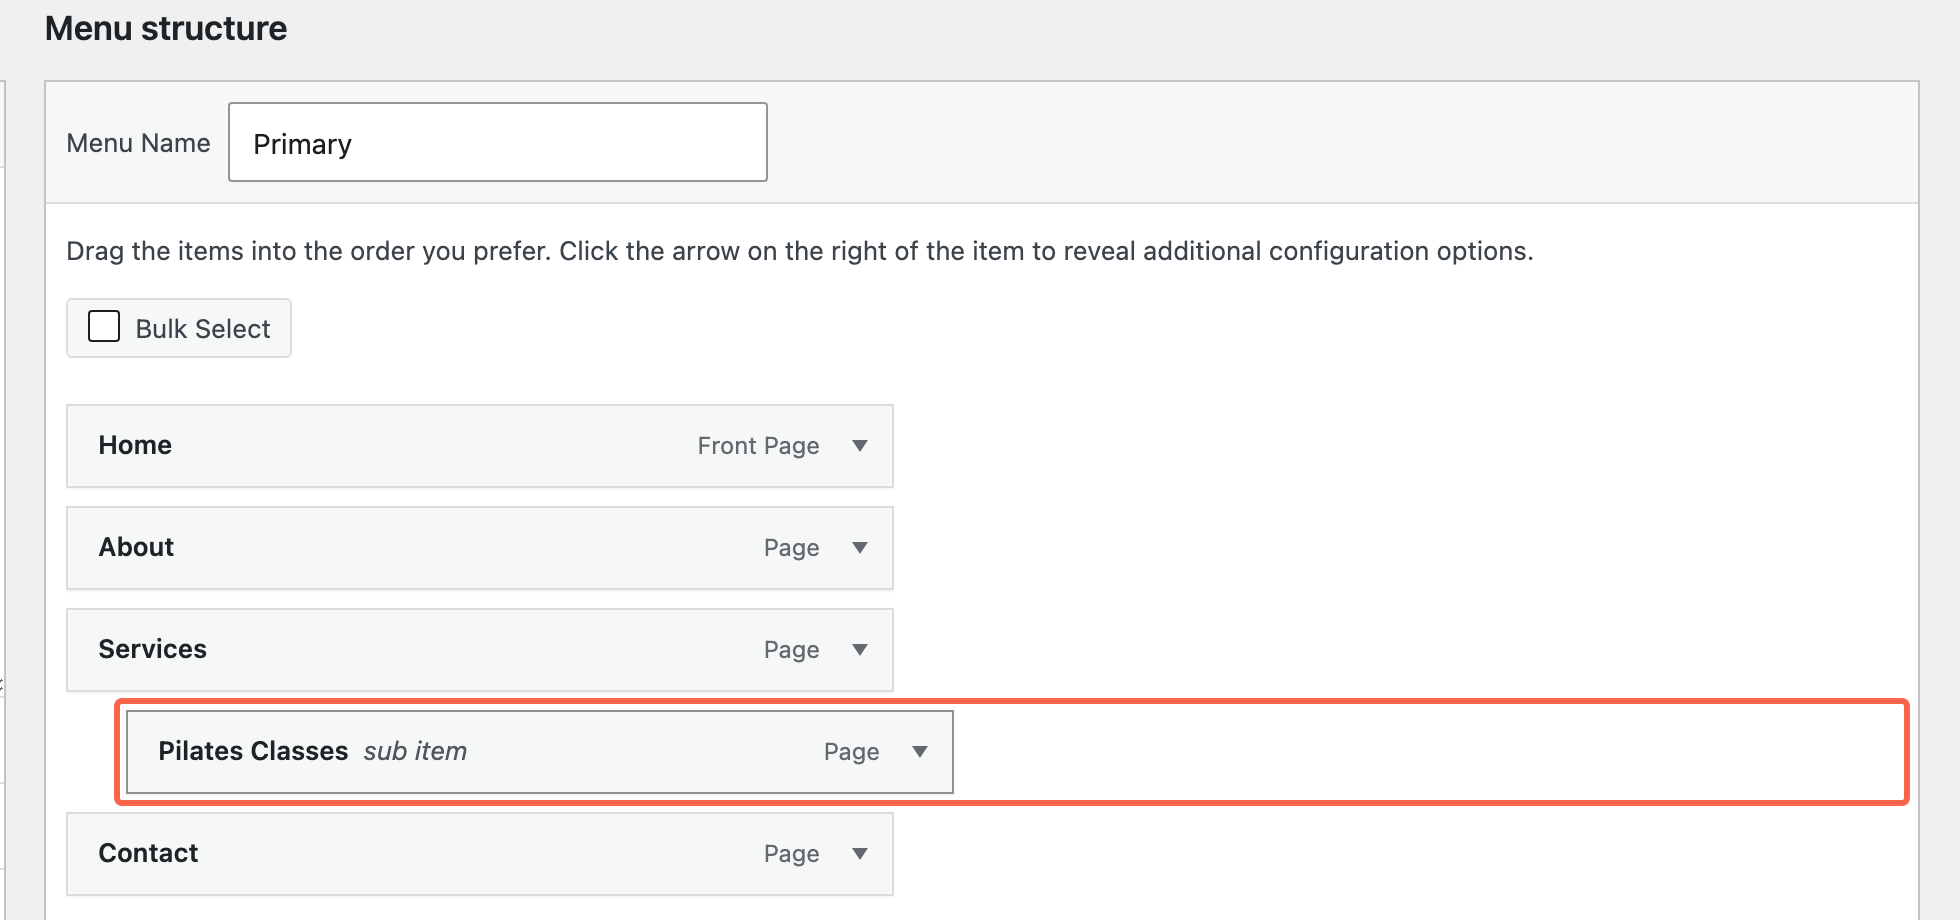
New items always land at the bottom of the list, which is rarely where you want them. The order in this list is the order across your website, left to right. Drag the item by its grey bar up or down until it is where you want it, and the other items shuffle aside as you go.
To make it a drop-down underneath an existing item, drag it so it sits directly below that item and then keep dragging a little to the right. It steps across and the words sub item appear in grey beside its name, which is how you know it has taken. Drop-down items are hidden until someone hovers over or taps the parent, so do not nest anything you need people to find immediately.
This changes the menu and nothing else. The page keeps the web address you gave it in step three. If you want the address to sit underneath another page too, that is the Parent setting back in the page itself, and the two are set separately on purpose.
Save the menu and check it on your website#
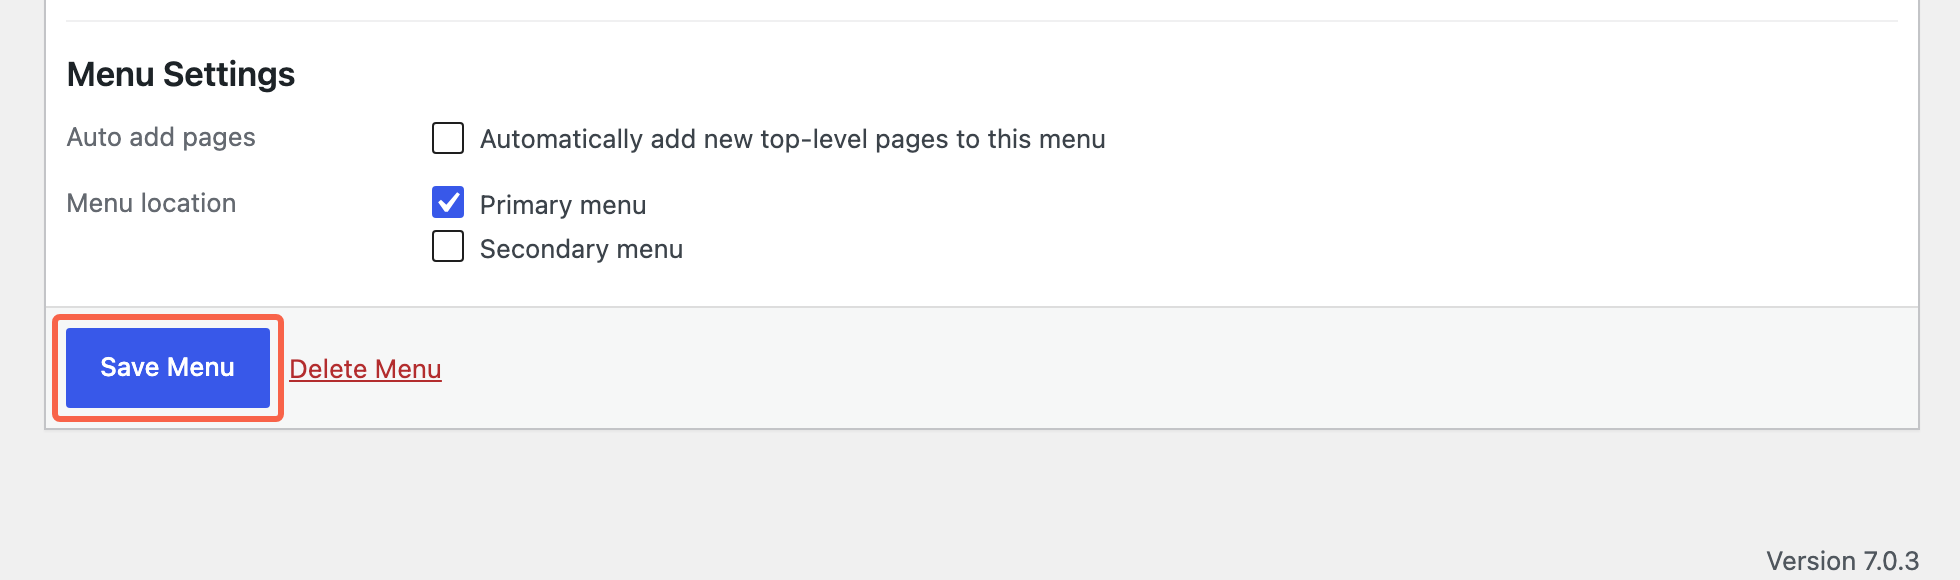
None of the adding or dragging has been written down yet. Click the blue Save Menu button at the bottom of the screen. A message appears at the top confirming the menu has been updated, and that is the point at which your visitors see the change.
While you are down there, look at Menu Settings just above the button. If Automatically add new top-level pages to this menu is ticked, WordPress will drop every new page you publish straight into this menu without asking, which explains both the websites where pages appear on their own and the ones where they never do. Menu location underneath is which menu on your website this list is being used for.
Now open your website in a new tab and look at the menu, hovering over the parent item if you nested the page underneath one. If you are still seeing the old menu, hold Shift and click reload, or open your website in a private window. Your browser keeps a copy of pages to load them faster, and so does the caching on your website, so what you are looking at may be a few minutes old rather than wrong.

Edit the navigation in the Site Editor if there is no Menus screen#
Some newer themes, called block themes, have no Appearance > Menus screen at all. On those, Appearance holds only Themes, Editor or Design, and Fonts, and the menu is edited in the Site Editor instead. Everything up to and including publishing the page is exactly the same; it is only this last part that differs.
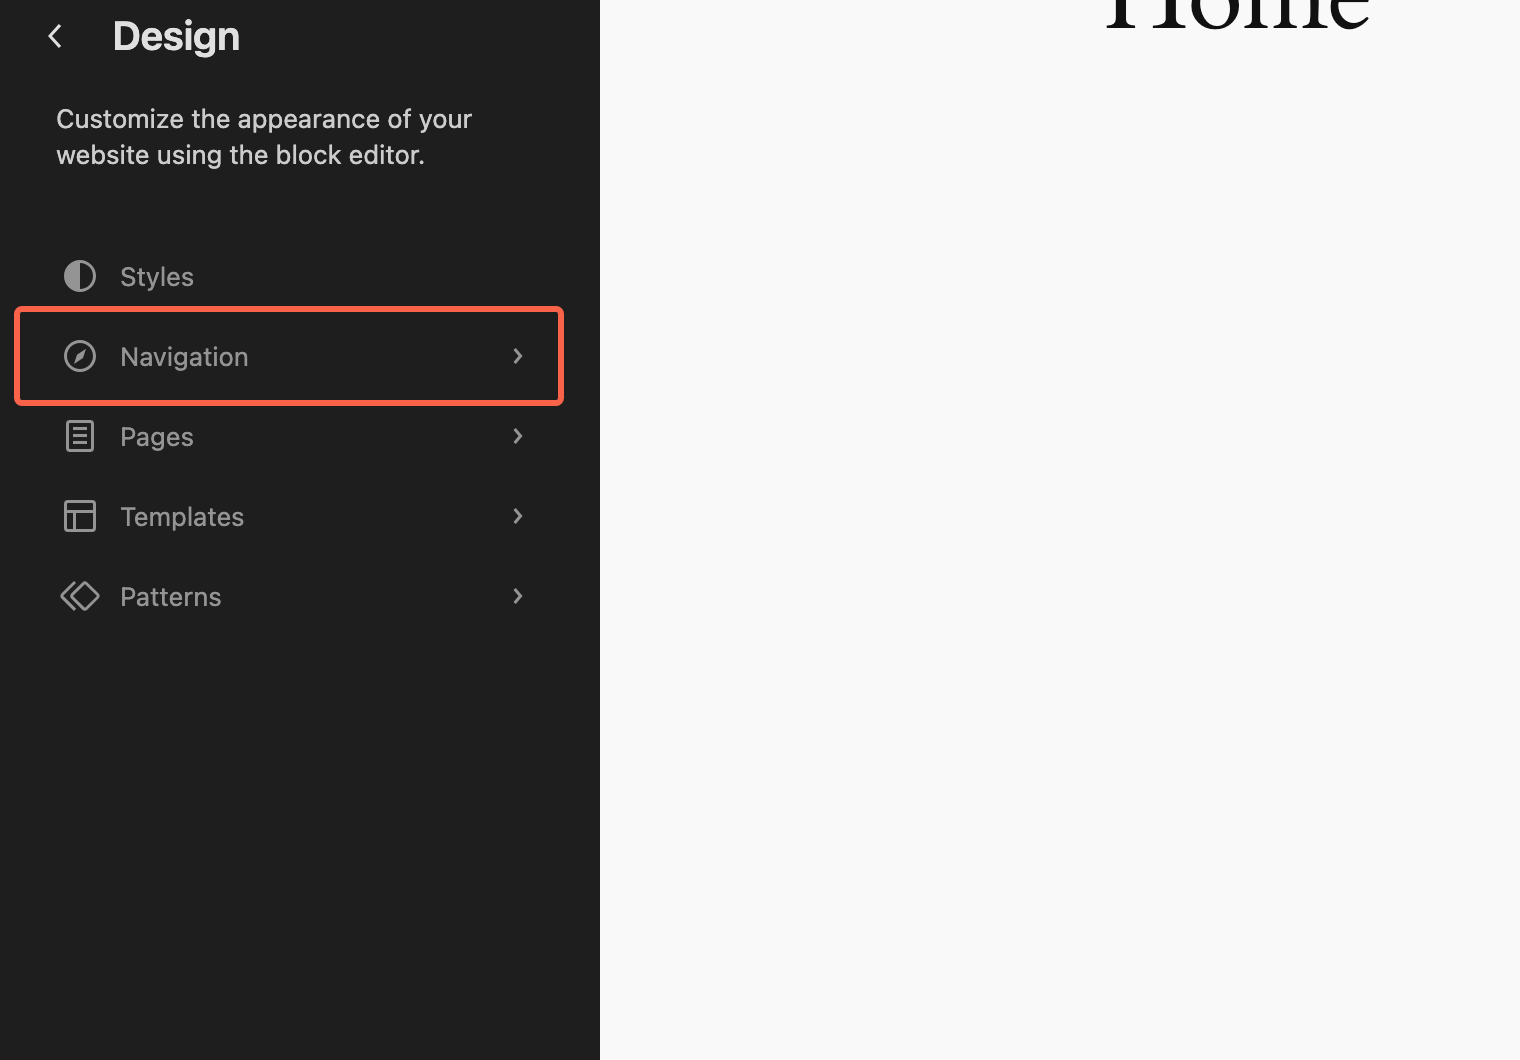
Click Appearance, then Editor or Design depending on your version. A dark panel opens down the left with Styles, Navigation, Pages, Templates and Patterns in it. Click Navigation, then click your menu to open it. You get the same sort of list of links, which you can add to, reorder and nest, and a Save button that works the same way: nothing takes effect until you use it.
One thing catches people out here. On a lot of block themes the menu starts out as a single Page List, which lists every published page automatically and in alphabetical order. If that is what you have, your new page is already in the menu and you did not have to do anything, but you also cannot reorder or nest individual items until somebody replaces that Page List with an ordinary set of links. That is a job worth handing to whoever looks after your website rather than doing in a hurry.
If your menu has grown into something nobody can find their way around, that is usually a problem with how the website is organised rather than with WordPress, and sorting it out is part of what we do on a new website design.
Tested on WordPress 7.0.3 with Twenty Twenty-One 2.8 and Twenty Twenty-Four 1.5, Rank Math 1.0.275, WP Rocket 3.23.1.1, Wordfence 8.2.2, 8 Aug 2026
Rather not do it yourself?
We can take this off your plate
If you would rather someone else handled the fiddly bits, that is what we are here for. Tell us what you are trying to sort out and we will point you in the right direction.
Let us give you a handWritten by